- Why a dome?
-
- Styling, we like the way they look,
- Efficiency of building materials (1/3 less surface area for the floor space),
- Efficiency of heating, more natural circulation.
- Is this a "do it yourself" project,
or are you working with a general contractor/builder?
- This is a massive "Do it yourself" project.
I am general contractor/carpenter. I will probably also do some wiring and sheet-rock.
I hired out the footings, but stacked the Blue Maxx blocks and poured
them with my crew (myself, my wife, my 14 year old son, 16 year old daughter, and friends.)
We did all the work on the main floor decking, and assembled the Timberline dome kit.
I also hired out the excavating and the shingles.
- Who did the design work?
-
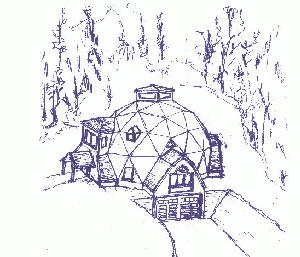
The dome shell and extensions are a stock Timberline Domes 40 foot diameter 5/8 dome.
The inside layout was entirely our design. One of the great features of a dome is that the
shell is entirely self supporting, so the interior can be any design you want.
The interior floor space of our dome will be around 2300 square feet.
This was the second home we have designed
so we had some concept of space. We did employ a local structural engineer
to be sure our internal floor structure was properly supported.
Timberline offers a design service that I would recommend to anyone considering a
custom interior design. The slope of the dome roof and extensions require some
special consideration. It is not as simple as laying out a floor plan.
-
I think I saw something on your web site about a
Timberline kit - can you tell me more about them and their role in your project?
-
We bought the dome shell from Timberline.
They supplied us all the shell structural members (metal hubs,
2x8 struts and studs), and the triangular skylights. We also bought the
Timberline extension kit. There are a large
number of compound miter cuts in the shell and having them pre-cut was
an enormous time saver. We supplied our own plywood sheeting, but
they would have pre-cut those also. Each sheet gets cut on the diagonal into 2 triangles.
I have been extremely impressed with the engineering and quality of the
Timberline kit. The hubs and struts just bolt together. We had the basic shell
structure standing in 2 and a half days. The compound mitre studs and t-blocking
fit perfectly.
- Why did you select a Timberline dome?
-
In the summer of '96, we took an around the country train trip and
visited 4 dome kit manufacturers. We saw Timberline, Oregon Dome,
GDI (Michigan) and Natural Space. We visited models and real homes
of all 4. Based on what we saw, we preferred a hub and strut system
over the panelized system, because we could assemble it ourselves, on site
and wouldn't need a crane to erect it. That left Timberline and
Natural Spaces.
The swing factor for us was that we wanted a sheet-rock
interior. The Natural Spaces homes all had wood on the inside of
the dome shell triangles. The reason
seemed to be that their strut construction (two
struts with plywood between) left the interior strut free to float
around and it needed the wood inside to stabilize it.
The seams of sheet-rock would crack.
The Timberline system has only one strut, tightly held in place by
flanges and bolts.
The Timberline dome I visited had sheet-rock
that didn't have cracks in the seams between triangles. I guess that is
what sold us.
The Natural Spaces design allows more room for insulation, but I believe
that the Icynene sprayed in foam product I am using will provide plenty
of insulating value in my Vermont location. (see the question on insulation)
- Why the Blue Maxx poured in place foam block foundation
- There were a number of reasons we chose the Blue Maxx blocks.
- Ease of set up. No wood forms are needed. The foam is the form.
And there are no forms to strip off when the concrete is cured.
It is possible for a competent "do it yourselfer" to put up a foundation
this way.
- Insulation value. The foundation insulation is built right in.
Both outside and inside. (R 40 once the concrete is poured in.)
And you can screw your sheet-rock right to it.
No interior studding needed to finish your basement space.
- Stronger foundation. The foam keeps the concrete moist longer
for a slower cure, resulting in a structurally stronger foundation.
- The Blue Maxx was the only brand of poured in place foam blocks
that has the adjustable angle corner block. Our foundation has ten
126 degree angles where the extensions meet the dome shell. The adjustable angle
blocks were just what the doctor ordered. No special corner bracing
was required. They also had 90 degree corner blocks for our 8 square corners.
The perfect product for a dome foundation.
- Did you have to be trained to install the Blue Maxx foundation
- Yes, training is needed. We arranged for an on-site training session the day
our blocks arrived. In about 3 hours, we were proficient at correctly installing
the blocks, even the adjustable angle corners. It then took us a week to stack
the blocks in place. We also had experienced help when it came time for the
pour. Although we might have been able to do it ourselves, it was very reassuring
to have help. The blocks performed as advertised and we had no problems.
We did have one close call where we had placed the block seams too close together,
but they held.
- How are you insulating all those triangles
- We are using Icynene spray foam insulation.
The Icynene product is R 4.0 per inch. The struts in our dome shell are 2x8's
(due to snow loading) so we will get nearly R30 in the dome shell. Since Icynene fills in
all the air leaks too, it actually gives you a higher effective R value
So I expect to be quite warm. With a sprayed in insulation, I won't need to cut
all those triangular pieces of fiberglass or rigid foam. The down side,
is that I have to hire out the installation. It is not a do it yourself product.
- Do you have a ventilation plan?
-
The combination of the Blue Maxx blocks, Dome shell, and Icynene
seems to have great promise for heating efficiency.
I also expect it to be very "tight" from an air change point of view.
To keep the air healthy in the living space, I plan to install a VanEE heat
recovery ventilator, that would
exhaust air from the bathrooms (4) and the kitchen, and feed air back into the
bedrooms and living room.
- What is the nature of the site
-
Our site is in a rural community of 1800 people. It is located in the
village center, but is on 8 acres and is fairly secluded. From the cupola
windows, we will have about a 200 degree panorama of pastoral Vermont
with the mountains in the background.
The soil conditions are solid ledge 18" below ground. We blasted out the
cellar hole and driveway (about 3000 cu ft of rock).
- Could you give me a brief explanation of
what an "Intermittent Sand Filter Septic System" is? Never heard of such a
thing.
-
Picture an 18x20 foot sand box, 4 feet deep. The effluent from
your septic tank is distributed (pumped) through a pipe system across the
top. I trickles down through the sand where a bacterial process
decomposes it. The remaining liquid is collected in a pipe and fed to
another tank, in my case a siphon (in other systems a pump tank).
When the siphon is full, it flushes
like a toilet down to my leach field. The benefit is that this system can
be used in marginal soil conditions.
- Can you hang stuff on the walls of a dome?
- Yes. My dome is a 5/8 sphere. The first row of triangles,
those that make up the exterior walls of the main floor, is nearly
verticle. In fact, some of them lean out a little. We have a
kitchen cabinet hanging on these triangles.
On the upper level the shell
wall does lean in, but you still have verticle interior walls. I have teenagers
and they like to decorate with posters. Posters held with push pins or tape
(my son loves duct tape but it is tough on paint) will hold posters at most any angle.
- Based on your experience, would you do it again?
- Yes. Puttering around the house has always been our hobby. We are enjoying
the process. I have a desk job, so having a project that allows you to see
concrete progress is very fulfilling.
- How did you ever do all this?
- I have asked myself this question a lot since we have completed the bulk of the work.
The answer that finally came to me was this.
First, create in your mind a picture of your home in it's completed form. A detailed picture
that you can drive up to and walk around in your head; really "see it". Bring up this
image every day, especially when the task seems enormous. Enjoy living in it.
Second, take one step at a time, and relish in each accomplishment. One project will
build on another, and before long, you will see that picture in your mind take shape
and become real. Go for it!! The sense of pride and accomplishment you feel looking at
your new home is tremendous.